 Installing and Using the UU Web Templates
 Installing and Using the UU Web Templates
Return to the UU Web Templates Home.
The UU Web Templates use a programming language called PHP that allows you to update text on the pages without needing to use a web page editor. Instead, you can go to an administrative web page that enables you to change the text right from your browser. The administrative pages require a password before they accept changes. You do not need to know or learn PHP to use the templates — the programming is already done.
This web page explains how to download the UU Web Templates, install the files on your congregation's web server, and configure it for your congregation. You may want to print this page and refer to it as you follow the instructions.

2. Transfering the Template to Your Web Server
a. Downloading the templates to your PC or Mac
b. Getting an FTP program
c. Uploading the templates to your web server
d. Fixing the file permissions
3. Customizing the Template for Your Congregation
a. The default username and password
b. Logging into the administrative pages
c. Setting your password
d. Choosing the color scheme and setting your congregation's name
e. Setting the top menu picks
4. Updating Each Page's Text and Pictures
a. Begin editing
b. Updating the main text
c. Updating the lefthand side menus
d. Updating the righthand sidebar
e. Updating pictures
f. Updating the calendar
5. Troubleshooting
a. Forgotten password
b. Zillions of error messages
6. A Peek into the Technical Details
a. The files in the template
b. Creating additional users
7. Tips and Tricks
a. Adding static pages to your site
b. Displaying different text for URLS

The UU Web Templates require:
In order to install the files on your congregation's web server, you'll need to know these facts:

Before you can use the UU Web Templates, you transfer them to your congregation's web server (that is, the computer on the Internet where your congregation's web site is stored). The easiest way is usually to download the files to your own PC or Mac, and then to upload them from your PC or Mac to your congregation's web server.
All the files that make up the UU Web Templates have been zipped together into a ZIP file. You need to download just this one file.
To download the UU Web Template to your computer, follow these steps:
Now you have the template files on your PC or Mac. See The Files in the Template for a list of filenames.
Note: Windows XP can open ZIP files — it calls them Compressed Folders. Just double-click the file. If your Windows computer doesn't have a program that can open ZIP files, download WinZip from www.winzip.com. If you use a Mac, Mac users can get programs named ZipIt, Unzip, or MindExpander from www.macorchard.com. Most Linux/UNIX systems include a utility called gunzip.
The next step is to upload the template files to your web server, for which you'll need an FTP program. Wiindows XP (and earlier versions) include an FTP program so lame, requiring you to learn and type a bunch of arcane commands, that we don't recommend it. Instead, use one of the following programs:
For more information about FTP, see the Internet Gurus Guide to FTP at net.gurus.com/ftp.
Before you upload the files to your congregation's web server, consider whether there is a web site there already. If your congregation already has a web site, create a subdirectory (folder) called "test" on your web site into which you can put the UU Web Template files. While the files are in this directory, you can configure the template for your congregation and test the pages until they look right — the pages will all have addresses that include "test/" before the page name. When your new site is ready, you can move the old files into a subdirectory (perhaps called "oldsite") and move the files from your "test" directory to the root directory of the web site.
If you are creating a brand new web site, go ahead and put the UU Web Template files right in the root (top-level) directory of your web site. The exact path or location of the root directory will be specified for you by your ISP or web host provider.
Once you've determined where on your web server you want to upload the UU Web Template files, use your web editor, Internet Explorer, or FTP program to upload them. Note that the HTML and PHP (.html, .htm, and .php) files should be uploaded as ASCII (text) and the JPG and GIF graphics files (.jpg and .gif) should be uploaded as binary. Most transfer programs do this automatically.
In order for you to be able to edit your congregation's web site through your web browser, you need to be able to make changes to the data files that contain the text, links, and pictures for the site. On web servers, each file and directory has permissions that limit who can do what which each file — read it, write (edit) it, and/or run it.
You need to change the permissions for the files in the /data and /admin/data directories so that the web server program (usually a program called Apache or IIS), running the UU Web Template programs, can change the files. Specifically, you need to change the permissions for the files with the .xml extension. (This doesn't allow the general public to edit your files, just the programs that are part of the UU Web Templates.)
If your web server runs Linux or UNIX: If your FTP program allows you to change the permissions for a file, you can do this yourself. For example, in FileZilla, select the files in the /data and /admin/data directories that have the .xml extension, right-click, choose File Permissions from the menu that appears, and check the Read and Write boxes for Owner, Group, and Public.
Or, talk to technical support at your web hosting company, or whoever manages the web server (the computer on which your congregation's web site is stored). Tell them that Apache and PHP (the web server program itself, and the PHP programs in our pages) need permission to be able to make changes to the files in the /data and /admin/data directories. Ask that the files with the .xml extension in /data and /admin/data have their permissions set to "666" — the UNIX/Linux name for the permission setting that allows the file owner, group, and other accounts to read and write the files.
If your web server runs Windows: Ask the web server administrator to make the /admin and /admin/data XML files (those with the.xml filename extension) writeable by the web server.

The next step is to tell the UU Web Template about your congregation — its name, town, and state or province. You can choose which color scheme you want to use — Sunflower or Blue-Green. You can also customize the items that appear on the site's main menu — the row of links that appear near the top of each web page, just below your congregation's name. You will also fill in the articles, left hand menus and text boxes in the template with information specific to your congregation.
To perform any of these tasks, you log into the administrative pages for your site — pages that the public never sees.
As delivered, the system has one username, with the following password:
Be sure to follow the instructions below to change this password! Choose a password that doesn't appear in any English-language dictionary, and that includes both letters and digits.
|
Whenever you want to make changes to your site, or change your site's password, log in by following these steps:
The following sections describe how to use each of the menu items. When you are done editing the site, choose "Log Out".
Note: The PHP Information link displays a page with technical information about your web server's PHP configuration. (PHP is the programming language used to make the Web Templates editable from your browser.) This link is provided for possible use when calling for technical support.
Tip: If you need to get back to the Site Administration Menu page, click the Admin link that will appear on the congregation's menu when you are logged in. If you can't find the Admin link, type your congregation's web address in your browser's address box, followed (with no intervening space) by "/admin" -- you'll see the menu.
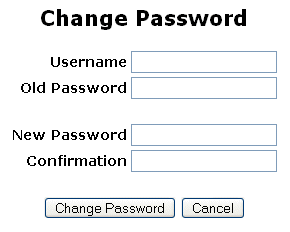 Before you make any other changes, you should change your password. When you first install the template, the username and password are the defaults listed above. You must change the password so that random visitors can't make changes to your site. You leave the username as "admin" unless you want to follow some rather technical steps to create additional usernames and passwords. (If so, see "Creating additional users" later in this document.) Follow these steps:
Be sure to change your password! If you don't, anyone who has read this documentation will be able to edit your pages!
You can change the basic information that appears in the title bar of the browser and at the top and bottom of each page. You can also choose between the two color schemes, Sunflower and Blue-Green, that apply to all the pages of the site.
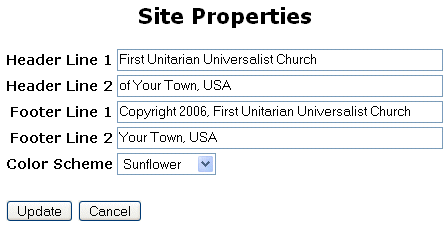 Log in as described in the section "Logging into the administrative pages." You see the Site Administration page.
The main menu for your site is on a horizontal bar near the top of the page, just below your congregation's name. It contains items like About Us, Newcomers, News & Events, and (at the right end) Home. Clicking each menu pick displays another web page. You can change these menu items.
If you're not sure what you want the top menu to contain, leave the menu as is. You can change it later. The UU Web Templates come with menu picks that are appropriate for many UU congregations.
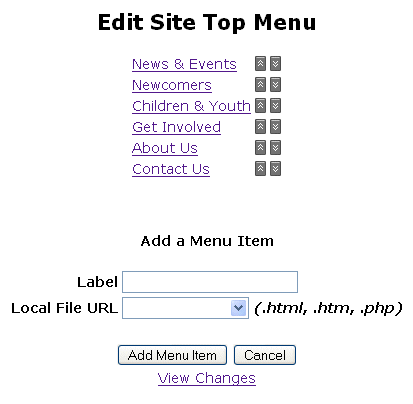  |
If you want to change the text of the top menu, follow these steps:
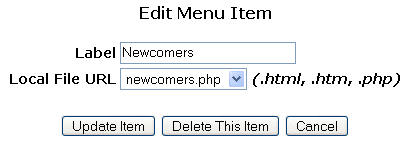
Note on renaming menu items: If you change the menu picks, the filenames of the pages don't change. For example, if you rename the "Newcomers" as "Visitors", the filename for the page remains newcomers.php. When you are editing the pages, the original names of the pages appear on the edit forms. For example, when you are editing the "Visitors" page, the title of the edit page is "Edit 'Newcomers' Main Text", because "Newcomers" is the original name of the page. But don't worry — the public sees only the names that you choose.
Note on adding menu items: The menu runs horizontally across the web page, and so the number of menu picks is limited. The exact limit depends on the size of the screens and web browser windows of the people who visit your site, which there is no way to know for sure. We recommend that you not increase the number of menu picks, or if you do, that you use very short menu names.
Finally, you need to provide the text and pictures that transform the UU Web Template into your congregation's web site.
Each web page contains three sections, from left to right:
When you are logged in and editing pages, each page contains buttons that the general public never sees — below each editable section of the page is an Edit button.
To edit a page, you log in (so that you can see the Edit links on the pages), find the page you want to change, click the Edit link below the section of the page that you want to change, and add or edit the information in the section of the page.
Tip: You can return to the administrative pages for the site by clicking the Admin link on the right side of the top menu, next to the Home link. This Admin link appears only for logged-in administrative users; the general public doesn't see it.
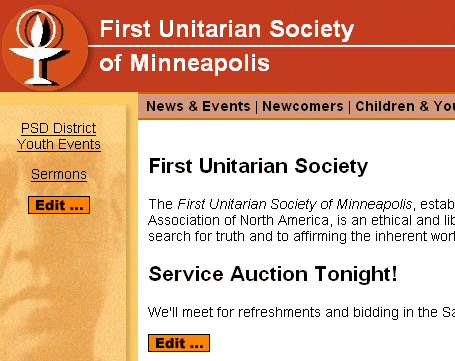 Once you are logged in, as you click from page to page on your site, you see Edit links that enable you to change the text and pictures on the page. To beging editing your pages, follow these steps:
The main text of each page is the text in the wide middle column of the page. The main text consits of a series of articles, and each article can include:
To change the main text of a page, click the Edit button below the main text you want to replace. You may have to scroll down to see the Edit button at the bottom of the page. You see an Edit Main Text page that lists the articles on the page, in the order in which they appear. Below the article list is a form you can use to add new articles, as shown:
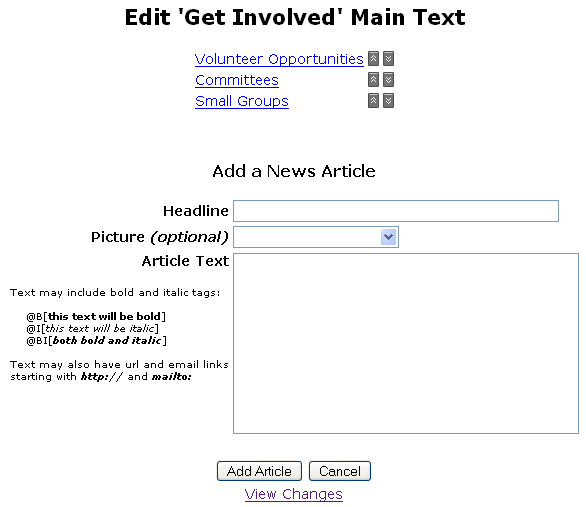
To add an article:
You can use the following codes to make things bold and/or italics. Normal HTML tags don't work. The codes are:
If you include the "http://" or "https://" at the beginning of web addresses, the page will automatically display them as links. Type "mailto:" before email addresses (with no space before the address) for the address to appear as a link.
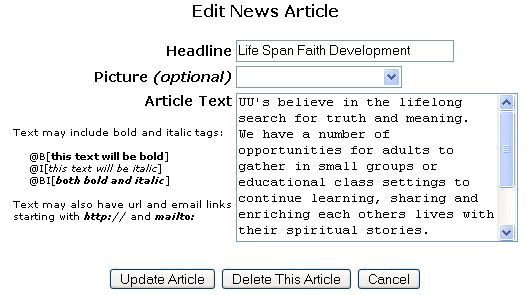
To edit an article:
To delete an article:
To change the order of the articles:
Click the up-arrow and down-arrow buttons to the right of the article list on the Edit Main Text page.
When you are done making changes, click the View Changes link to see the updated version of the page. Your changes are live — they appear on the site, visible to the public, immediately.
|
The lefthand side menu is the lefthand column that contains links that relate to the topic of the page. For each link, you specify text that you want to appear on your page and the URL of the page to which you want to link.
For each side menu that you want to change, follow these steps:
The righthand sidebar is the righthand column, which can contain one article, consisting of a headline, optinoal picture, and text.
For each sidebar that you want to change, click the Edit button for the sidebar that you want to update. You see an Edit page for where you can edit the article in the sidebar. See "Updating the Main Text" for how to edit an article (Or just fill out the form and see what happens!)
One picture can appear with each article in the main text of the page, in the middle column of each page. A picture can also appear at the top of the sidebar, the righthand column
For each picture that you want to change, follow these steps:
The News & Events page (or whatever you have renamed this page) contains a calendar of events. You can add events to this calendar, edit events, and delete events. You don't have to delete events after they occur; the program automatically stops displaying events after their expiration date. The calendar doesn't display as a real calendar, with boxes for each day. Instead, it displays as a chronological list of upcoming events.
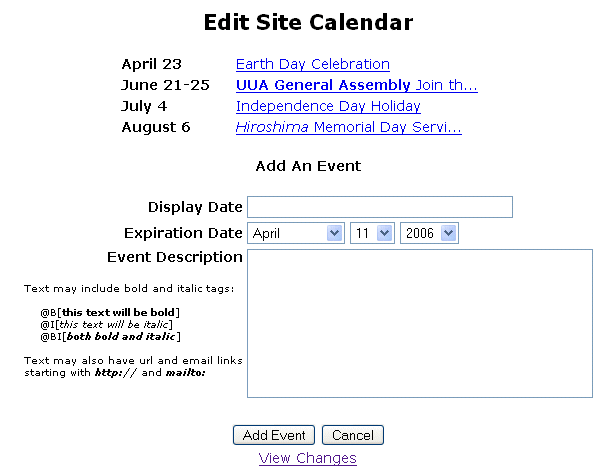 To update the calendar, follow these steps:

Here are some problems you might run into, with solutions.
Problem: No one knows the password to log into the site to make changess
Solution: If you forget the administrative password for the templates (that is, the password that you enter on the /admin page to login into the administrative pages), UU Web Templates Tech Support can send a replacement password file. See Technical Support for who to contact for help.
Problem: The PHP programs in the web pages need permission to be able to make changes to the files in the data and admin/data directories, because these directories contain the editable text, menus, and pictures. If you see a set of errors like this, you have a permission problem:
Warning : fopen(/var/www/cvuus/data/index_text1.xml): failed to open stream: Permission denied in /var/www/cvuus/include/XmlSimpleBaseClass.class.php on line 172
Warning : fwrite(): supplied argument is not a valid stream resource in /var/www/cvuus/include/XmlSimpleBaseClass.class.php on line 173
Warning : fclose(): supplied argument is not a valid stream resource in /var/www/cvuus/include/XmlSimpleBaseClass.class.php on line 174
Warning : Cannot modify header information - headers already sent by (output started at /var/www/cvuus/include/XmlSimpleBaseClass.class.php:172) in /var/www/cvuus/admin/textblock.php on line 27
These error messages indicate that the PHP program in the web page tried to modify one of the data files, but it "failed to open" because "Permission denied."
Solution: You need to talk to technical support at your web hosting company, or whoever manages the Web server (the computer on which your congregation's web site is stored). Tell them that the PHP programming in the web pages — actually, the web server program (Apache) itself -- needs permission to be able to make changes to the .xml files in the /data and /admin/data directories. Request that the permissions for these directories and files be changed to "666".
Actually, your web server administrator has two options:
If your web hosting service cannot handle these permissions, consider UUism.net (www.uuism.net), run by Jim Hermann. UUism.net servers support PHP and Jim can set up your site with the necessary permissions.

The UU Web Templates use code written in the PHP programming language that is included on each of the web pages. Because the pages include PHP code, the filenames of the pages end in ".php". The PHP code includes (copies in) text from separate text files into the web pages before they are sent to the user's browser. This means that when you update the text file, the web page(s) that include that text file are automatically updated. For example, if your congregation changes its phone number, you make the correction in one file, and this information is automatically included on all the pages on your web site that include that file.
The UU web templates also use style sheets (CSS) to define how the text on the pages is formatted. The typefaces, type sizes, and other aspects of text formatting are stored in a .css file that is referred to by all the web pages. Changing the formatting in the .css file changes the format of text in all the web pages in the template.
When you use an administrative page to update a file that is part of the site, the administrative page displays the contents of the file, enables you to make changes, and (when you click Save), stores the updated text in the file. Be careful that only one person makes changes to a file at a time. If one person is editing a file, another person also starts editing the same file, the first person clicks Save, and then the second person clicks Save, only the second person's changes will be saved, because the first person's version will be overwritten by the second person.
Once you have transfered the files to your congregation's web server, you should have the following files.
Web pages: These are the pages that the public will see.
Graphic files: These are pictures and logos that appear on one or more pages.
Data files: These are the files that contain the temporary text and pictures that you will replace with text about and pictures of your own congregation. When you click an Edit button on a page, you are editing the text in one of these data files:
Other files:
Normally, the system has one username, "admin", and you change only the password. However, you can change the username or create usernames if you don't mind editing an XML file. The file is called login.xml, it's stored in the /admin/data directory, and you can edit it with any Linux/UNIX editor (like nano, pico, emacs, or vi).
The default login.xml looks like this:
<?xml version="1.0" ?>
<properties>
<admin>D033E22AE348AEB5660FC2140AEC35850C4DA997</admin>
</properties>
An administrator could manually duplicate the admin line and edit the <admin></admin> tag to create a new user, like this:
<?xml version="1.0" ?>
<properties>
<admin>D033E22AE348AEB5660FC2140AEC35850C4DA997</admin>
<margy>D033E22AE348AEB5660FC2140AEC35850C4DA997</margy>
</properties>
Then you could log in as "margy" with the same password as "admin", but once logged in you can change the password to whatever you want.
A security note: The login.xml file is in a web folder because it simplifies installation. However this makes it viewable by anyone thru the browser. We encrypt (hash) the password to make it very hard to forge (not impossible though, for commonplace passwords.) If an attacker is able to overwrite the file (through FTP, for example) with another version, the attacker can install other usernames and passwords and edit your pages.

As congregations use the UU Web Templates, we'll add notes here about additional things you can do to customize your site. If you do something interesting or useful with the templates, please write to templates@uuism.org with information, and we'll add it here.
What if you want to add pages to your site beyond what's in the template? You can create a page that uses the same page design, and then you can add whatever text you want.
1. Create a page with a filename ending in .php.
2. Add the following to the beginning of the page:
<?php
include_once("templateconfig.php");
include_once($TEMPLATE_PAGE_START);
?>
<!-- PAGE CONTENT GOES HERE -->
This code tells PHP to include the formatting that the web templates use.
3. Add whatever you want to appear on the page.
4. Add this at the end of the page:
<!-- END OF PAGE CONTENT -->
<?php
include_once($TEMPLATE_PAGE_END);
?>
This code tells PHP to include the rest of the formatting that the web templates use.
5. Save the page in the root directory of your web site. If you want to save it in a subdirectory, you may need to fool with the filenames in the include() functions to point to the relative location of the files.
If you get error messages on the page, you may need to set the permissions for the new page.
Karin Gates found a way to display different text than the URL. She writes:
In News.class.php, I declare:
var $_anchorRegex = '/(@A\[)([^\s]+)(\s)([^\]]+)(\])/i';
Add this line to the htmlFilterSelective function:
$output = preg_replace($this->_anchorRegex, "<a href='$2'>$4</a>", $output);
And remove this line:
$output = preg_replace($this->_linkRegex, "<a href=\"$1\">$3</a>", $output);
Update taghelptext.txt to use this notation:
@A[ http://someurl.com <text to display>] Or @A[ mailto:somebody@somewhere.com <name of person>]
So if I enter this:
@A[ http://www.microsoft.com Microsoft]
The following html is generated
<a href= "http://www.microsoft.com" >Microsoft</a>
More tips and tricks coming... as we figure them out!

You can get help with installation and design by e-mailing one of the team that created these templates, at templates@uuism.org.
Or, join the UUTemplates mailing list:
If your congregation uses the UU Web Templates, please consider making a donation to help defray the cost of the project. Please email the same address.
This project was funded in part by the UU Funding Panel.
Thanks for using the UU Web Templates, and we hope that they are helpful to your UU congregation!
Last updated April 14, 2006, Margy Levine Young
Return to the UU Web Templates Home.